Monday, March 27, 2006

I just wanted to let you know about a very good interview with Françoise Laurent, a highly regarded authority on kesa sewing of the sangha of master Deshimaru. You'll find it at http://www.zen-road.org/ the website of Philippe Coupey's students. Warmly recommended!

Friday, March 10, 2006


As I was reading, I found this excerpt from Zen ni kike of Kodo Sawaki. I could not resist putting it on this blog. To my foolish ears, it sounds that what Kodo is talking about is the formless field of happiness, zazen-kesa, kesa-zazen:

"Life doesn't run on tracks. Birdsong knows neither major nor minor. Boddhidharma's teaching doesn't fit on manuscript paper. The Buddha-Dharma is unlimited. When you try to hold it still, you miss it. It isn't dried cod. Living fish has no fixed form".

Thursday, March 09, 2006


San-e. In Buddhism and according to the most ancient texts, every monk or nun has to wear three different kesas.

The anda-e ( in Chinese: an to hui, in Sanskrit; antarvasas). It is also called tan-e: simple clothing, ge-e: lower garment, gojo-e: five stripes robe…

The uddara-e ( Ch: yu to long seng, Sans: uttarasamga)

The sonyari-e ( Ch: seng chia ti li, San: samghati)

In Theravada, the monk wears three robes one on the top of another. The first one ( antarvasas) is a kind of underwear and is wrapped around the waist. The uttarasamga is unfolded on the left shoulder and the samghati is used as a coat.

Originally, the anda-e was seldom used. According to the Vinayas, a monk could wear it if he was on his own, sick,crossing a river or looking for a new kesa. Later on, in China, other clothings were introduced and gradually the anda-e stopped being a kind of underwear. Monks started to wear it on the top. This robe has changed a lot, and the rakusu that we all know well is one of its forms ( the two other kinds of anda-e in Zen the Okau, large rakusu that one wears on the left shoulder and the hangesa , “half kesa” that is given to lay people).

The uddara-e is also known as the shichijo-e, robe of seven stripes, each panel being made of two long segments and a short one. It is the monk’s kesa, it is used for sitting, taking meals, rituals.

The dai-e, is the big robe. It can be made of nine, eleven, thirteen, fifteen, seventeen, nineteen, twenty-one, twenty three or twenty five stripes. It is used for rituals and ritual begging (takuhatsu).

The rule is for monks and nuns to always have the three kesas with them. That’s why we have now a set of three small kesas called “shosanne”. In Japan, all the disciples of kodo Sawaki carry these three kesas with them.

In the next post I shall introduce the sewing of the nine stripes kesa.

Wednesday, March 08, 2006


Rev. Dai-En Bennage, abbess of Mt Equity ( http://www.mtequity.org/), had the kindness to send a wonderful and touching email in which she tells about her very inspiring experience in Japan and manifests clearly her boundless devotion to Tataghata's teaching and his kesa. You may read more about this funzoe in Zen Friends : http://www.sotozen-net.or.jp/kokusai/friends/zf16_2/practicing.htm


"(...)Twenty-seven years ago, on takuhatsu in Nagoya, I received discarded bolts of silk of all kinds from a bankrupt kimono shop. I guess it was an inner voice that meted out to where and how much cloth should go to others. For last year, we found we had just enough for the funzoe`. It could be a small book to tell of what we went through to make it. And Okamoto Sensei (will you be having fukudenkai with her?) telephoning us: "Now you blue-eyed ones. Don't forget. This robe is not for human eyes. It is for the Buddha's eyes. Do not make it too bright." We sent panels to people in Japan to sew on, and to eight states in the U.S. It was wonderful. The granddaughter disciple of Sawaki Roshi, Wako Sensei of Myogenji gave me linen material in a "dried grass" color. It took me 17 years to complete it! I started it in Japan, then got too busy pioneering our temple here. When it was needed, it was a French disciple now in Ales who helped me finish it. I first made a robe for my teacher from some of this donated silk. Being from a poor temple, he'd given me his colored robe when I was given Transmission. The material I had was white. I did not have money to have it dyed. So I went on the alms round for seven months asking housewives if they might have some onion skins to spare. When I had the proper weight of onion skins (LOTS of onion skins!) I dyed the cloth with them, and set the color with the mordent of rusty nails. I boiled it outdoors with a long stove pipe supported by a step ladder, pointing the smoke away from the dye vat! It turned out to be "mokuren", like Soto robes generally are. I would never have had the courage to take on this challenge, except for being poor, and because the result was to be "mottled". How could I lose? "

17 years! I was quite proud of my four years, but I think you are now and by far the winner of the competition.

Thank you so much, Dai-En.

Buddha bless

Testuten

Tuesday, March 07, 2006


If I may I would like to share a few directions-suggestions about kesa sewing:

Many mistakes are done when you sew a kesa, stitches disappearing, imperfections…as much as possible, we don’t correct mistakes, we notice them and our reaction to them. The point is not to make a work of Art, something sublime; it is to be utterly sincere and true. Clumsy or not is irrelevant. Please, don’t be obsessed with small stitches. Many kesa I have seen in The AZI are really beautifully sewn but a few of them are not alive (too good) for they display more intention of right doing than total care freeness. The kesa is not a rigid but a flowing form.

The kesa is not a personal thing, your-my possession. I feel sorry for all these people I have met in different temples and Zendo of the West refusing even that somebody would sew on “their” kesa. There is nothing one can call “my” kesa. The kesa is the robe of stillness and selflessness. We merely borrow it as elements are borrowed to manifest this body-mind. It cannot belong to anybody for it is the robe of not knowing.

Be really awake to your own lack of patience. Kesa making requires a lot of time, and I often experience a burning-creeping sense of expectation. If you can allow it, don’t expect or even dream completing the work. Work for nothing. Just sew. Sew also for others, most of my kesa were given to monks and nuns and lay people. It is a good practice to sew for sewing or for others. It is good practice to give.

One practice I always enjoy is to sew as a group on a single kesa. Any type of robe can be sewn collectively, 7. 8,9,13,25 stripes robe.

Every so often, ask yourself: “how can I sew mists, fields, surburbs, shouts, chirps, rubbish, old shoes, sky, clouds…together? “ Most useless question which opens the door to what is open.


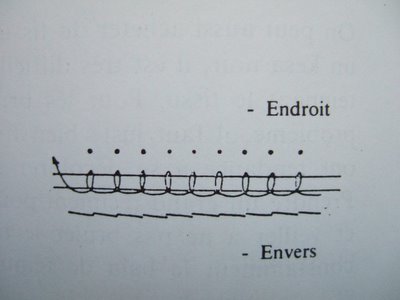
Should one recite anything during the sewing? Some sewing schools recommend to chant Namu Ki E Butsu. Namu as the needle is inserted, Ki E as it comes out and then Butsu as you pull the thread. This means, “I take refuge in the Buddha, I take refuge in the Dharma, I take refuge in the sangha.” What is very advisable is to remind ourselves that we can breathe all right, our reaction to sewing shortens our breath. And I believe this is why originally monks and nuns where singing they heart away: to keep on breathing.

Unlike in the Soto sect, Nyohoe kesa has nothing to do with you-me being special, important or whatever. It doesn’t have to show if you are a beginner or an experienced monk. Bullshit (pardon my French…). Black is not better, black is in Japanese training monasteries the color of the kesa of young monks who did not receive Dharma transmission. Unless you care too much about offending some high rank Japanese priest, I would not worry. Follow the instructions about the color: broken, mixed not primary. There is great joy in sewing and wearing the robe. Joy. Not pride. Joy. Nyohoe kesa is the kesa of rebels, destitute, excluded people. Nyohoe kesa is not the kesa of institutions. It is not made by professional robe makers but by fools who will hang it in trees so birds feet can soil it, so the rain can soak it, so the wind can play with it, so it can be stained ( Tenjo) by life.

And when we meet sadness, sorrows, death, suffering, may we open this kesa and let it be wide open on all things...

1980. I was seventeen at the time. There was a Zen Temple in Valenciennes where I used to go once a month to sit with the monk, Francis, a solid, down to earth guy. I remember collecting three sheets of paper with very basic and rough drawings and instructions. I really wanted to sew a kesa and knew nothing about sewing. It all really started one Saturday afternoon, after Zazen, we turned round facing the altar for a bit of chanting and there it was, a nun called Antoinette, sitting all wrapped in a beautiful and yet so simple kesa. She was radiating in spite of everything, in spite of herself. From that day on, I had it in my mind everyday: I had to sew that thing.

So one morning, I go to a shop to get some fabric with no idea of what I could/should buy. And I end up with the thickest kind of coarse cotton and a thread that has almost a string quality to it. And I get started. Cutting the rough cotton, nothing straight, bad scissors and inexperienced sewer, day after day, night after night, stitch after stitch, the robe comes true in my hands. What a mess! Nothing is right about it, the proportions, yo, frames…and the stitches, rather knot looking when I compare them to the impeccable and beautiful kesa sewn by skilled hands. A true robe of rags. I bring it along to a senior monk who looks unimpressed…he shows me how to put it on and take it off.

I still remember it, the day before I receive Shukke, a nun comes to me and ask: “Have you beeen shown how to sew properly? Who taught you how to sew the frame?” I look pretty confused and answer something stupid like:”I didn’t know… sorry… I am self taught… I did my best”. She walks away apparently quite happy with my shy mumbling.

This kesa is the true kesa. Full of imperfections. Full of mistakes. I made a mess of it. I make a mess of my life too. I studied closely Kodo Sawaki’s kesa and sewing style, it is wonderfully clumsy . Even if with time I got more skilled I now understand that beautiful or not, skilful or not, right or wrong…are but flowers in the eyes.

The point is to sew, with all your heart and being. To drop your views and come back to it, as you come back at every stitch with your needle and thread.

If you really want to understand what the kesa means, then get down your high chair, leave the house made of solid thoughts and beliefs, allow a deep breath, play with clouds and enjoy your mistakes. It’s always a good start.

Monday, March 06, 2006


The 24 000 stitches are nothing
but all these breaths in and out
all these stars up in the dark blue night sky
voices of children playing, birdsongs, eyes of the beloved ones
raindrops, feet on snow, mud and shimmering dew
things old and new
and always now

Can't you see?
The 24ooo stitches
are life
just as it is

Saturday, March 04, 2006


Here we are. This is how to sew a kesa. As I wrote many times, face to face transmission of the sewing method is best. At least, I have tried to provide people with basic instructions and I am willing to carry on with the nine stripes kesa, as well as writing on Funzoe sewing. I would be happy if people help themeselves to the content of this site and most grateful if we could get some feedback or some other contributions. You may also meet me at Blue Mountain: http://pierretesuten.blogspot.com/ Please, don't hesitate to spread the word and write a few posts. Thank you.


After late spring rain the falling petals swirl
Weightlessly celestial scent covers my patched robe
A simple vacant mind has no place to go
Resting on the peak I watch the clouds return

- Han Shan Te'-Ch'ing, 1600 Translated by Red Pine

Get the four squares ready (4cm/4cm), sew them on each corner of the kesa at 5mn from the bottom edge of the frame, stitches should go through the fabric and be seen on the back.

Then you have got left two squares (feet for ties) and 3 long stripes. Get the squares ready, they should be 8cm/8cm.

Fold the long stripes, draw a line at 1cm from th edge then sew and and with a pencil ( or better, using chopsticks, put the fabric inside out so the sewing is hidden, iron).

You have to make a buttonhole at the centre of each square and get the ties inside that buttonhole.

One square is sewn on the front of the kesa at a third of the width from the left hand side at 15cm from the edge. The second one is sewn on the back, two thirds of the width, 8 cm from the edge.

Then make the knot of the front ties as shown on picture.

Friday, March 03, 2006


Seven stripes kesa with toyoma (distant mountains), 18 century.


Now comes the trickiest part. In order to put together the frame or border and the body of the kesa you’ll need patience and may be personal guidance. I will try to make it as clear as possible.

Take the long stripes or cuts of 207 cm / 6 cm. Draw a line at 1 cm from the edge for the fold. Draw another line at 4 cm from this previous line.

Put the folded frame on the back of the kesa and sew the top line. Do the same with the 2 other frames and sew them too. You end up with two frames sewn on the back of the kesa as shown on the picture.

You now have to draw a line on both parts of the frame on the front of the kesa at about 4 cm from the angle. Draw a diagonal line as shown on the picture. Leave 1 extra cm and cut the extra fabric.

You just have to fold the fabric as shown on the picture making sure that the length part of the frame overlaps the width.

You may then sew the middle line and the first line. The outer line is already sewn, it was on the back, as you moved the frame on the front it is now showing.

Thursday, March 02, 2006


My body dressed with the robe of the field of happiness
Calmly, I possess the Universe
I stay or leave as it wishes
a pure breeze blows the white clouds
Daichi Zenji
Once you get your seven vertical panels sewn, you then start to put them together overlapping each other following the same method for vertical panels and starting from the central panel ABC which, according to a symbolic tradition, represents Shakyamuni.


For sewing vertical panels on left or right, the central ABC panel is viewed as the original A panel in sewing vertical panels in the first instance.

You should end up with a perfect square ( that seldom happens to me...). And then, you are ready for the big adventure of the frame. Next post.
"The method of washing, receiving and retaining the kesa cannot be known without learning in practice in the inner sanctum of the legitimate face-to-face transmission of those methods"

Dogen, Kesa-Kudoku

So now, the nitty-gritty of kesa sewing: how to get these patches together?

Without a teacher and face to face transmission, it is hard to understand. But we are going to give it a go.

You have 21 pieces in front of you. You first sew the vertical panels ( ABC, CBA, DEF) and those are constructed in such a way that the pieces at the top of the panel always overlap each successive lower piece. These seven panels are then sewn together so that the two vertical seams of the central panel ( ABC) overlap the panel flanking either side and each successive panel is overlapped from the panel closest to the centre toward the outer edge of the robe.

You take your first piece A and draw a line at 1 cm of the bottom edge ( for the fold) and another one at 6cm from the previous line ( for the yo).

Do the same of your B.


Put them back to back, the first line of B matching the second line of A and sew.


Then stretch the two pieces, iron, make the yo, fold and sew the first line of A on B.


Do the same to sew AB on C.

Wednesday, March 01, 2006

A few golden rules…

As much as possible, be consistent with your sewing and sew everyday until completion of the kesa ( don’t do as I do sometimes: 4 years on the same kesa, it is just outrageous...)

Remember that you are sewing the Buddha’s robe and show respect to the fabric ( you may put it on a shelf, it should not be left on the floor…). While sewing, burn incense if you wish. If you know Alexander technique and apply the directions ( neck free, head forward and up…) you might not experience the pain of sewing ( sewing is the activity that shows your misuse right away). Notice how much your are restricting and holding your breath while sewing...

You must cut the fabric and not tear it. A nice pair of scissors is always a good companion.

You should always iron the fabric, so your sewing is neat and precise. Be careful, it’s easy to burn stitches and fabric when ironing. Better use it at a mild temperature. Iron every single fold, it is so much easier if you do it well.

Thread is very important. Silk is best. Generally the thread is white. You may go for orange or yellow. But white is best.

No knots should be visible on the kesa. You have to hide them by pulling them under the fabric. Ask somebody familiar with sewing, they will show you.

Make sure that you pull on the thread and make a firm stitch every time.

The stitch used for the kesa is the back stitch. No other stitch should be used.


And the stitches should be regular and small ( 1-5 mm bettween each stitch). On the front of the kesa, you get a line of small stitches like small "dots". On the back, small dashes or lines slightly diagonal.


In order to make a seven stripes kesa and if your Chu is 43cm:
Length of kesa is 123cm and its width 205cm
Length of the small dandyaku is 23 cm
Length of the big dandyaku is 40 cm

You will need to cut: :

5 patches A: 37cm/35cm
(Width 23+6+6+2= 37
Length 23+4+6+2= 35)

5 patches B: 37cm/54cm

5 patches C: 37cm/52 cm

2 patches D: 35cm/35cm

2 patches E: 35cm/54cm

2 patches F: 35 cm/52 cm

frame: 2 long stripes: 207 cm/ 6 cm
2 long stripes: 125 cm/6 cm

4 squares: 6cm/6cm


2 squares: 10cm/10cm

ties: 2 long stripes 42cm/4 cm
1 long stripe 72cm/4 cm

I generally add an extra cm to every measurement, just in case... I leave it up to you.

You may also put the kettle on...


The kesa is generally made of different patches sewn together. Different parts are given different names and it is useful to know them in order to cut the fabric and get the measurements right.

Yo are the narrow stripes, it means “leaf” the bits of land between rice fields are often covered with dead leaves.

Dankyaku are parts between Yo and represent the watery patches of a rice field. On a seven stripes kesa , you’ll find big and small Dankyaku.

The size of Yo (stripes), daiza ( ties), en (frame), kakucho( squares) never change.

So when you cut the fabric, you have to find out the precise measurements for each patch. You will need 21 patches to make the main part of your kesa. You’ll need 6 types of patches: A,B,C,D, E, F. You’ll need 5A, 5B,5C, 2D,2E,2F. The precise measurement of these patches depends on the size of your kesa ( therefore on your chu)
you will need to add folds and , yo width etc.